
Zoom Accessibility Best Practices
To get started using Zoom, consult the CU Zoom Help page. The list below is a collection of information and tips on how to make Zoom meetings as accessible as possible for all participants, including participants with disabilities. Most functions in Zoom are user-friendly and are accessible to people who use assistive technology. There are, however, a few exceptions and best practices to be aware of.
Provide Support
When possible, it is helpful to have a support facilitator in each Zoom session who can handle any accessibility issues or requests that arise. This should be someone other than the main presenter or facilitator of the meeting. Let participants know that they can send a private chat to this person for support. For large meetings or structured events, provide a way for people to request accommodations in advance of the meeting.
Audio & Video
Sound Quality
Sound quality is important for all users and critical for people who are d/Deaf or hard of hearing, and is important for individuals with ADHD, autism, and more.
Reduce background noise: When speaking, ensure you are in a noise-free environment and stay close to the microphone.
Mute participants who are not speaking: Especially in large meetings, all participants should be muted except for the person who is speaking.
If participants are not consistently muting themselves, the host can mute individual participants in the Manage Participants panel.
The host can also use the Mute All tool or the Mute Participants on Entry option to apply muting to multiple participants at once. The “Mute participants on entry” option can also be selected when scheduling the meeting.
Let participants know that they have been muted upon entry and state expectations for how and when they should unmute themselves and participate.
Video
Some attendees may prefer to not turn on their video in a meeting for a variety of reasons, such as medical privacy concerns, concerns about the ways in which the use of video may reveal or highlight disabilities, the anxiety or distraction that being on video can cause, and more. It is best to provide the option for participants to choose not to enable their video, in both the classroom and business settings.
Screen Sharing
Sharing your screen is a good way to display PowerPoints or other media, pull up an editable whiteboard, or walk participants through a process step-by-step.
Verbalize what is on the screen. Participants who are calling in or have bad internet connections may be unable to see the screen. People who are blind or have low vision may also be unable to see the screen, and cannot read the screen-share contents using assistive technology. For the benefit of anyone who may be unable to see your screen, verbalize what is seen and the actions you are taking. Consult our guidance on providing spoken description of visual content for more details, and please share it with anyone who will be presenting visual materials during the Zoom session.
Share materials ahead of time. Send any materials you plan to display through screen sharing to your participants ahead of time. This allows everyone to access the materials and follow along even if they cannot see the screen share during the meeting.
Interaction Methods
Chat
In-meeting chat can be very useful during meetings, including as a participation channel for people who are working in noisy environments. There are just a few accessibility considerations to keep in mind when using chat.
Some participants with disabilities may be unable to access or fully utilize chat. Some users may decide to not monitor the chat because they can't do so while focusing on the verbal conversation. Assistive technology users can access, read, and contribute to chat, but may be unable to activate links in the chat window.
Participants who are calling in to a meeting will not be able to see or contribute to the chat. Finally, all users run the risk of losing important links or content from the chat if this information is not saved in some way.
Due to these limitations, we recommend that when using chat in Zoom:
Avoid side conversations in chat. If important questions or points are made in the chat, make sure to repeat them out loud so everyone knows what was said.
Share chat content through additional channels. Send links from the chat to all participants by email before or after the meeting. Optionally, you can save the entire chat to your computer or the cloud for your own reference or to share with others.
Breakout Rooms
Breakout rooms can be used for small-group discussion and collaboration, but make sure to think about accessibility when you plan to use them.
Provide flexibility in participation. People with certain disabilities like anxiety may prefer not to join a breakout room. Whenever possible, it is best to allow participants the option to remain in the main Zoom session if they would prefer not to join a breakout room. Keep in mind that some people may be able to get more out of the experience by using that time for quiet reflection, taking a quick computer break, or by reviewing the content discussed up to that point.
Pay attention to accommodations. If live captionists or ASL interpreters are present, make sure to assign them to the same breakout room as the participant receiving the live captioning or ASL interpreting. (Please note that Zoom's automated live captions are now available in breakout rooms.)
Give participants the ability to record, if necessary. If the Zoom session is being recorded for later review or captioning, the host will need to give participants the ability to record if the host will not be in the breakout room that needs to be recorded.
Plan ahead for technical difficulties. Some devices and technical set-ups do not allow participants to join breakout rooms. See Zoom’s breakout room guidance for more information. Participants who cannot join breakout rooms can use the main room as an alternative space for discussion.
Polling
There are creative ways to use the polling feature for participation during meetings or to survey participants. Hosts should keep these best practices in mind:
Ensure everyone can participate. The polling feature is accessible to people who use assistive technology. It is not usable, however, by people who are joining a meeting by phone. If you have participants joining by phone, offer an alternative way for them to send in feedback.
Alert participants when launching a poll. Notify participants verbally when you are launching a poll. This is especially helpful for assistive technology users as well as anyone who may not be looking at their screen.
Give enough time. Allow plenty of time for participants to find and participate in the poll.
Reactions
Reactions can be a great way for participants to interact and provide feedback during a presentation. However, not all participants may be able to see reactions before they disappear, and it may take additional time for some users with disabilities to locate and enable reactions. If you plan to require all attendees to use reactions as a way to take a poll, we recommend using the polling feature instead. Reactions are best used as a voluntary and non-essential method of participation.
Raise Hand
Raise Hand is a great feature to help provide structure to a large-group discussion. It provides a clear way for people to participate who may miss the social or auditory cues that indicate when they can speak. It is helpful to review with participants where they can find the "Raise Hand" feature. It is also helpful to let participants know that they can add their questions to the chat if they are unable to utilize the Raise Hand feature for any reason.
Recording Zoom Calls
Recording your Zoom session can be very helpful for people with disabilities who may wish the review the content at a later date.
Choose where to store the recording: You can either record a meeting and save it to Zoom Cloud or save the file to your computer. One reason to store to the cloud is if you want your media transcribed. See the “Transcripts and Captioning” section, below, for more on this.
Note: Zoom Cloud uploads at CU Boulder will be automatically deleted after 120 days. Additionally, Zoom Cloud experiences variable processing speeds so your recording may not be available right away, and automated captions may not appear immediately on the recording. If a fast turnaround time for video processing is essential, record and save to your computer.
Choose how to share the recording: Consider OIT’s Guidance for Storing Documents in the Cloud before selecting a platform to ensure adequate data security for the information contained in your video materials. Additionally, consult with the person you are sharing the media with to ensure they are comfortable using whichever platform you select.
If you chose to record in Zoom Cloud, you can share a direct link with anyone who needs access to the recording.
To share local Zoom recordings with students, it is best to upload them to Kaltura (“My Media”) in Canvas. See step 5 of the Zoom Record a Meeting guidance for instructions.
To share local recordings with faculty or staff, you can use the campus’s Large File Transfer service, Google Drive, or other similar media storage services.
Captioning and Interpreting
Live Captioning
If using live captioning, please share information with participants at the start of your meetings about how to view captions and share that both the font size and position of the captions can be adjusted individually by participants. There are two types of live captioning: automated and manual.
Automated Live Captioning
Zoom provides free automated live captioning for all Zoom accounts at CU Boulder. Please follow this tutorial to set up automated live captioning in Zoom.
Live captions benefit a wide variety of people, and we highly recommend enabling them in your meetings. Participants will be notified that live captions are available, and can choose to turn them on or not. Please note that automated live captions are not accurate enough to be used to fulfill a captioning accommodation. Instead, please consult the Manual Live Captioning section below for guidance on fulfilling accommodation requests for live captioning.
Manual Live Captioning
For live captioning provided by a person (not an automated service), there are two steps that are required in order to incorporate live captions into your Zoom session.
The session host will need to enable closed captioning in their Zoom account.
Secondly, the captionist will need to be provided with a way to add captions to the Zoom meeting. There are two ways to do this.
The captionist can join the meeting as a participant and be granted the ability to provide closed captions by the host.
The captioning service can be integrated as a 3rd party provider.
Students registered with Disability Services can arrange for live captioning through their access coordinator. All other individuals who need to arrange live captioning for an accommodation can contact the campus ADA office to request live captioning.
Transcripts and Captioning for Zoom Recordings
Some hosts find it helpful to review or share transcripts of Zoom sessions after the session is completed. Recorded sessions can also be captioned for later viewing.
Zoom recordings stored in Zoom Cloud will be machine-transcribed. The transcripts generated through this process will not be completely accurate, but the video owner can correct them for accuracy within the Zoom Cloud interface. Transcripts may be useful for a variety of viewers; for longer videos in particular, the interactive transcript tool in Zoom Cloud can help viewers jump to a specific part of the video they'd like to rewatch.
- If your recording requires captioning to fulfill a student or employee accommodation request, Zoom Cloud’s machine-generated transcripts are not sufficient and you will need to work with the campus captioning service to send the video to a vendor for captioning. Please contact Captioning@Colorado.EDU for guidance.
ASL Interpretation
ASL interpreters will need to join the call just like any other participant and share their video. Interpreters should have the Zoom application downloaded on their device before joining the call for best functionality. Interpreters do not need to log into Zoom with an IdentiKey.
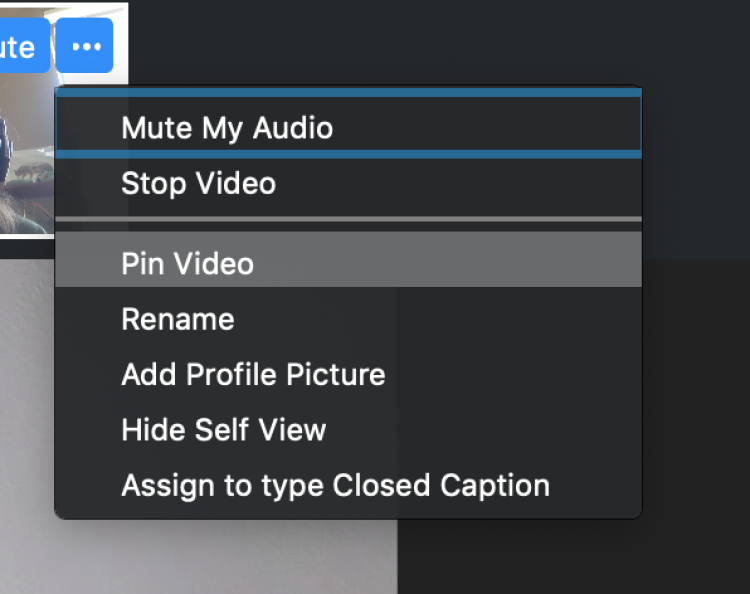
Participants who wish to view the ASL interpreter should select “Pin Video” in the context menu (“...”), which is available by hovering over the interpreter’s video thumbnail. (Please note: Accessing the Pin Video feature currently requires the use of the mouse to hover. This issue is being reported to the vendor.)
Students registered with Disability Services can arrange for ASL interpreting through their access coordinator. All other individuals can contact the campus ADA office to request ASL interpreting.
Get Help or Provide Feedback
For questions or comments regarding accessibility in Zoom, please contact the CU Digital Accessibility Office at DigitalAccessibility@Colorado.EDU. For general questions about Zoom, contact OIThelp@colorado.edu or attend an Academic Technology Training.