
Musings
This is a place for random ideas, tutorials, or just plain fun things that are related to, but not necessarily limited to, lab interests. Future musings will be available as links on the right side of this page. Let's kick off this page by talking about the title image, you see above, of a suit and then a copy of the same suit with what seem to be a black and white pattern overlayed. Let's talk about what's going on.
Spacial vs Temporal Aliasing
Temporal Aliasing (a quick review)
As mechanical engineers, we first talk about "aliasing" with respect to recording sensor data on a computer or some kind of data aquasition hardware like a National Instruments DAQ system. It is very important to understand that today's computers and data aquasition hardware are Digital, instead of analog, sytems. That's important because the act of recording your data, on a digital system, is known as "sampling" and aliasing only occurs when a signal is sampled. The phenomenon would not show up in an analog system. Sampling is the act of collecting data at every \(T_s\) (sampling time) seconds. At this point, many have you have been taught and shown figures like this (By Moxfyre - Own work, CC BY-SA 3.0, Link)
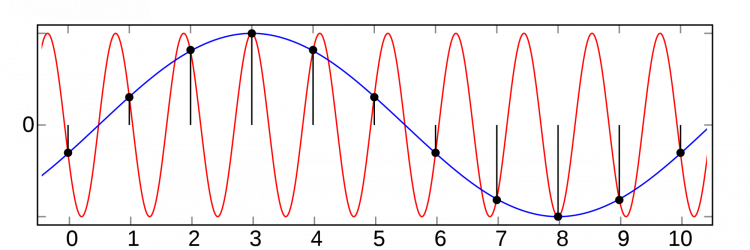
where the original, in red, isn't sampled fast enough (so not enough data points per period of the signal) which then creates a fake signal, in blue, when the samples are connected in some way (called reconstruction). The fake blue signal is know as an alias and is an aberation. This is unwelcome to engineers since you will collect the data, from an acceleraometer let's say for example, trying to figure out the natural frequency (\(\omega_n\)) of a structure, but instead of reading the correct natural frequency, you end up reading a fake (alias) frequency which is much different than the actual one. We also learn, to prevent aliasing, you need to sample at a rate (\(f_s\) in Hz) greater than the twice the higest frequency content (\(f_{max}\)) of your signal (atributed to Nyquist and Shannon), so \(f_s \geq 2 f_{max} \). That's not a complete statement, in practice, you need to use an anit-aliasing filter first before sampling (which I'll discuss more below).
In general, aliasing is demonstrated as a temporal (since we're sampling every \(T_s\) seconds) and usually a single dimension where a single vector of data captures the whole waveform, but aliasing can happen in multiple dimensions and not just in time. We will demonstrate below an example of aliasing happening in space and in 2D. Have you ever seen a car tire/rim look like it's spinning backwards even though the car is going forward... this is another example of temporal aliasing. Remember I said that aliasing can only occur when the signal is sampled, and it won't occur in the analog works, so where is the sampling coming from with respect to a car time/rim spinning backwards? It turns out that you most likely saw this phenomenon happen inside of a tunnel or on a video, where the 60 Hz artificial lights are strobing (sampling) the car in the tunnel and video is shot at 30 frames per second (30 Hz samping rate). Note that Hertz is a rate of times per second (Hz = 1/s) and by definition refers to time only. Check out this cool video of temporal aliasing of a flying helicopter where the 30 Hz sampling is in syced with the rotor spin rate:
[video: https://www.youtube.com/watch?v=yr3ngmRuGUc]
Spatial Frequency
So we've been talking about sampling signals that have periodic signals (think sine waves, or at least a superpostion of multiple sine waves) in time, but now I want to talk about periodic signals in space (and in 2D dimensions). Think about the stripes of the american flag, they repeat every so many time per milimenter (1/mm or whatever unit of space you want to use, rather than 1/s as we have seen in temporal). But now it's also in 2D, so it's so many times per mm in the y-axis and the x-axis. See the figure below which shows three different striped patterns.
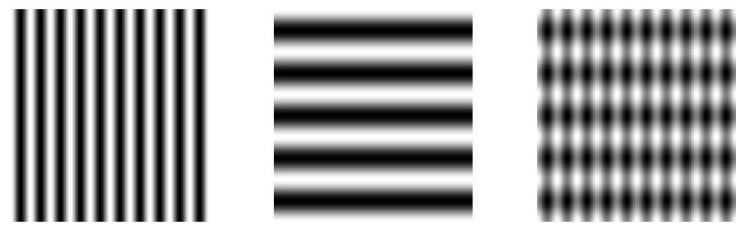
Note that when you compare the first and second patters, the first is a higher spatial frequency and has not component in the y-axis when as the second has no frequency component in the x-axis (say 4/mm in x vs 2/mm in y for example). The third pattern is actually superposition of the first and second and has frequency components in both x and y axis but at different values. This stuff is too cool!
Spatial Aliasing
Now that we see that signals can have frequency content in space (so 1/mm), not just in time (1/s), we can deduce that aliasing will occur in space also but in multipel dimensions (x and y axis rather than just the time axis). As was stated above in the aliasing refresher, we know that aliasing only occurs when you take a continuous signal and sample it at discrete values. It turns out that we sample in space all the time! When you take in image, you convert a continuous time 2D spacial signal into a digital (or discrete-space) signal because your camera has so many finite pixels to represent the real-world that you're looking at. Sampling rate, in this case, would be in terms of samples (or pixels) per milimeters rather than samples per second. So the resolution of your camera, along with your distance from the object you're taking a picture of, is going to define the sampling rate. So given a camera resolution, the closer you are to the object the highter the sampling rate.
So just like aliasing in time, if you don't have a high enough spatial sampling rate, you will create these fake patterns in your image due to aliasing! So I took a picture, from that new fandangled world-wide-web, of a striped suit and opened in Preview on my mac and then proceded to re-scale the image smaller. By doing that, I took the image and reduced the number of pixels (on my screen) in that image and therefore reduced the sampling rate to below twice the frequency of that pattern and created those aliasing patterns which are not real just manifistations of re-scaling! I'd be out of breath if I was say that last sentense out loud :). I took a video of doing that re-scaling and you can watch it here:
[video:https://www.youtube.com/watch?v=XGQPKx9uCNQ]
So the title image is the original picture of a patterned suit, obviously a different suit than in the video but you can tell that there's a pattern due to the fibers in the suit, and then a rescaled image (smaller) to create the aliasing pattern (sometimes refered to as Moire, but moire is technically not aliasing and maybe I'll write a seperate musings on that). You'll note that they are the same size in the title image, but that's because I zoomed in to the shrunken image to look like the original scale. You can see that the aliased image is blurrier and that's because it has worse resolution even thought they look the same size.
Anti-Aliasing Filter
One final note before I end this topic. You probably noted something interesting at about 12 seconds into the striped suit video above... look again if you didn't notice. My mouse button was pressed down the whole time, while I was re-scaling, and then at 12 seconds I stopped and let go of the mouse button. At that moment, you'll notice that the aliasing seemed to have disappeared! What kind of magic is happening!
Before explaining that, let's go back to the temporal aliasing refresher that we had at the beginning of this post. Remember that I said that even if you are sampling at twice the highest frequecy (\(f_{max}\)) in your signal, in practice, you should use an anti-aliasing filter. An anti-aliasing filter is just a low-pass filter that has a cutoff frequency at \(f_{max}\). You pass the original signal through the filter before sampling which removes higher frequency signals that would be aliased due to undersampling. The odd thing is that if your signal has no frequency content beyond \(f_{max}\), than a low pass filter that cuts off at \(f_{max}\) would have no affect at all and would be useless. That assumption is theoretically correct, but in practice there's always frequency content beyond the max frequency you're interested in, usually manifested as noise, and therefore you will always get aliasing no matter what sampling rate you use. So the trick is to pass your signal through a low pass filter and get rid of any higher frequency content that you're not aware of that may cause aliasing when sampled.
This idea is also true for re-sampling. So when you scale an image, that is already digital, you want to pass it through a low-pass filter (anti-aliasing) before you re-scale. So that's exactly what the Preview program did... when I released the mouse button, the program took the original image and low-passed it before re-scaling displaying the final image. They just aren't doing that anti-aliasing step until I release the button... but who knows, maybe they'll fix that some time. Of course I'd rather they don't fix it, so I have an something cool to show my students :)
Hope you enjoyed this!